
How to effectively measure goals on your website, with instructions on how manually or automatically trigger goals.
Think about what you want your users to do on your website. Now think about what specific actions visitors take which contribute to those objectives. Perhaps it’s completing a purchase, contacting sales, downloading a financial report, or visiting a certain page.
These actions are already being tracked by Extellio and you can find the stats in their respective tabs. Making them goals allows you to easily see conversion rates, which type of visitors convert and what marketing channels they’re coming from.
Making your objectives goals creates measurable KPI:s for your website that you can track, analyze and communicate with your team.
Managing goals
To add or edit goals, you go to the analytics settings and select "Goals" in the sidebar menu. (Not to be confused with "Goals & Funnels" higher up in the menu, which is where you view the data. You manage under the settings.)

Examples of good goals:
- Track visits to important pages, for example a contact form confirmation page, product pages or to company information.
- Downloading a financial report, product specifications or whitepaper
- Spending a certain amount of time at a page, like a support page.
Begin by naming the goal

Next, choose between automatic or manual

If you want to trigger goals automatically (recommended):
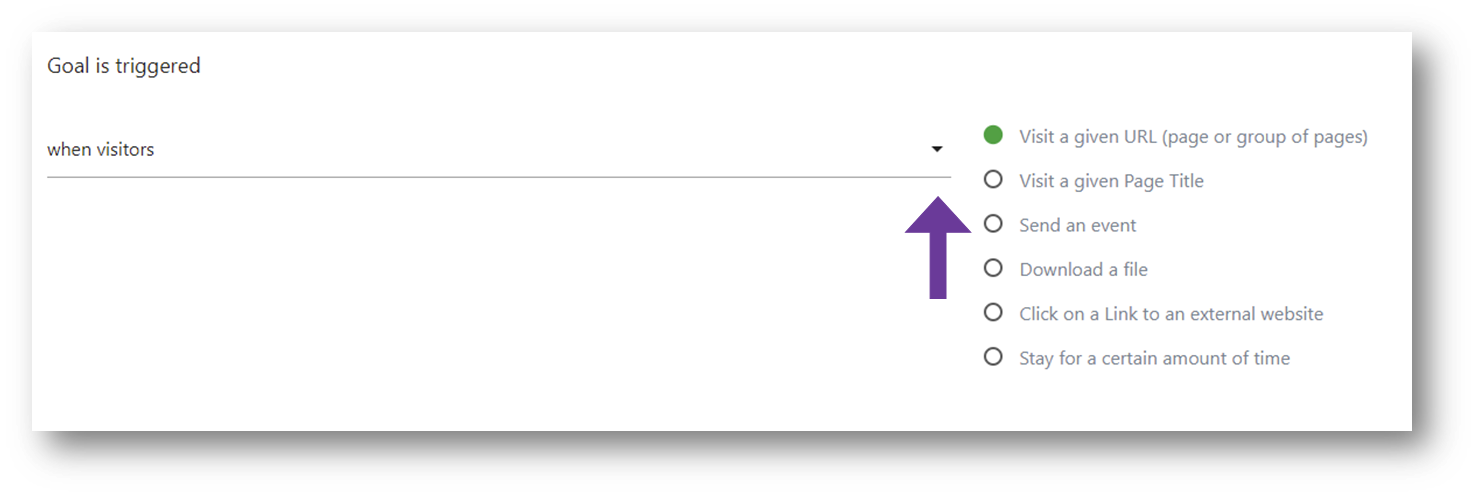
Choose how you want to trigger your goal:

… and then define your trigger

Contains
Contains is useful for when you want to track partial URL paths or a range of options with a similar theme. Contains /products/ would for example match these URLs:
- www.example.com/products/
- www.example.com/products/couch?=black
- www.example.com/products/bed
Is exactly
Is exactly is for when you want to track specific URL paths.
Is exactly www.example.com/order-confirmation would match www.example.com/order-confirmation,
but not www.example.com/order-confirmation?=ordernumber123
or www.example.com/cart/order-confirmation
Matches the expression
Matches the expression uses regular expression (RegEx) to match patterns in text. It’s useful for more advanced tracking and allows you to specify any pattern you want to match.
If we wanted to match URLs containing Products OR Services, we could use:
(.*)products(.*)|(.*)services(.*)
which would match the following URLs:
www.ex.com/products/couch
www.ex.com/services/installation
Next choose if the match should be case sensetive

Allow multiple conversions
Next decide how you want to count your conversions. Should a visitor be able to convert more than once? Take subscribing to a particular newsletter - you probably want to count that once, no matter how many times the confirmation page is refreshed.
But if the goal is sending a job application you probably want to allow the goal to be converted each time an application is sent, not just the first application the visitor sent.

Set a goal revenue (optional)
Choose if you want to attach a monetary value the goal conversions. Even if a conversion isn’t directly generating revenue, it’s probably still worth something. You can choose to set a default revenue for the goal, or you can skip it.

Voilà! You created your first goal!
If you want to trigger goals manually
Manual triggers lets you create your own trigger for the goal. It could be submitting a form, clicked on a button or submitted a cart. Generally, it’s best to track the conversion as an event and then use automatic triggers to flag it as a goal. Events allow for a wider array of segmentation than goals.
To manually trigger a goal you need to add a snippet of code:
extellio_actions.push(['trackGoal’, 1]);
where 1 is the goal id. You can also add a dynamic revenue to your goal like this:
extellio_actions.push(['trackGoal', 1, <?php echo $cart->getCartValue(); ?>]);
… but usually, it’s better to use to E-commerce tracking for purchases.
 Click the arrow to switch to the manual trigger.
Allow multiple conversions
Next decide how you want to count your conversions. Should a visitor be able to convert more than once? Take subscribing to a particular newsletter - you probably want to count that once, no matter how many times the confirmation page is refreshed.
But if the goal is sending a job application you probably want to allow the goal to be converted each time an application is sent, not just the first application the visitor sent.
Set a goal revenue (optional)
Choose if you want to attach a monetary value the goal conversions. Even if a conversion isn’t directly generating revenue, it’s probably still worth something. You can choose to set a default revenue for the goal, or you can skip it.
Voilà! You created your first goal!